Leveraging Particle Connect within Android applications
Particle Connect for Android
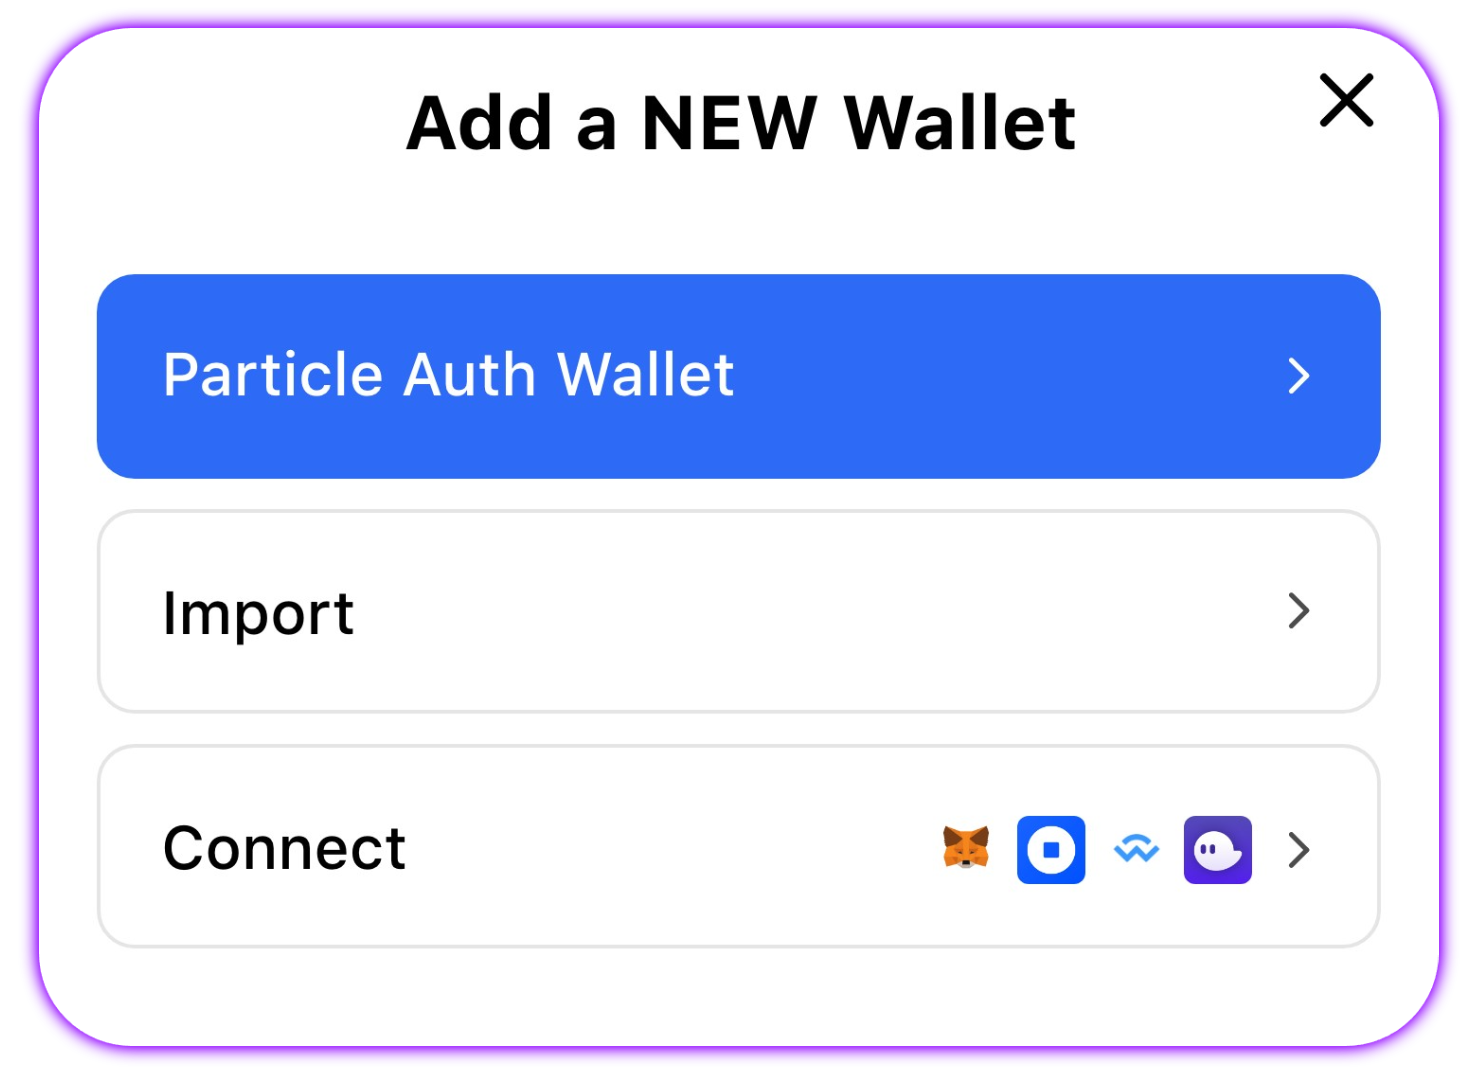
Particle Connect enables onboarding through Web2 accounts (via Particle Auth) and various Web3 wallets (via. WalletConnect, Solana's mobile wallet-adapter, and key imports). Particle Connect is a custom, in-house connection modal designed to onboard users across different login verticals. In this case, these are Web2 accounts, Web3 wallets, and private key imports. This essentially unlocks universal accessibility within your application, bringing users (Web3-native or not) on-chain.
Implementing Particle Connect as the primary connection mechanism within your Android application only takes a few steps, which are outlined below.
Repository
Before diving into the configuration and utilization process, if you'd like to take a look at the repository for an initial understanding of the underlying architecture and implementation flow, the Particle Connect Android SDK repository can be found here (includes demos and examples).
It is strongly discouraged to use a private key or the mnemonic import/generate function. If you use it, you need to secure the data yourself, as Particle doesn't have a relationship with the imported/generated mnemonic or private key.
Getting Started
Dependencies
Installing and initializing Particle Connect is quite simple. In this case, this can be summed up in three steps. The first of them involves dependency management within your build.gradle file. Particle Connect requires numerous dependencies, the extent of which depends on the functions you intend to use within your application.
To configure these dependencies, open your build.gradle file, and either paste the below code or conditionally define dependencies based upon which types of wallets you'd like to support:
- Regardless of specific functions, you'll need
network.particle:auth-service:{latest-version}(Particle Auth),network.particle:connect:{latest-version}(Particle Connect), alongside either of the following:network.particle:connect-auth-adapter:{latest-version}- This is the standard Particle Auth adapter (very similar to the typical Particle Auth SDK).network.particle:connect-auth-core-adapter:{latest-version}- Alternatively, you can use the Particle Auth Core adapter (very similar to the Particle Auth Core SDK).
- If you'd like to support importing (or generating fresh) wallets on EVM chains, you'll need
network.particle:connect-evm-adapter:{latest-version}.- To do the same on Solana, you can use
network.particle:connect-solana-adapter:{latest-version}.
- To do the same on Solana, you can use
- To support connection with Phantom (on Solana), you'll need to use
network.particle:connect-phantom-adapter:{latest-version}. - For a general WalletConnect-based connection, you can use
network.particle:connect-wallet-connect-adapter:{latest-version}.
dependencies {
  //required
   modules {
      module("org.bouncycastle:bcprov-jdk15to18") {
          replacedBy("org.bouncycastle:bcprov-jdk15on")
      }
  }
  implementation 'network.particle:auth-service:{latest-version}'
  implementation 'network.particle:connect:{latest-version}'
  implementation 'network.particle:connect-auth-adapter:{latest-version}'
  // implementation 'network.particle:connect-auth-core-adapter:{latest-version}'

  implementation 'network.particle:connect-evm-adapter:{latest-version}'

  implementation 'network.particle:connect-solana-adapter:{latest-version}'

  implementation 'network.particle:connect-phantom-adapter:{latest-version}'

  implementation 'network.particle:connect-wallet-connect-adapter:{latest-version}'
}
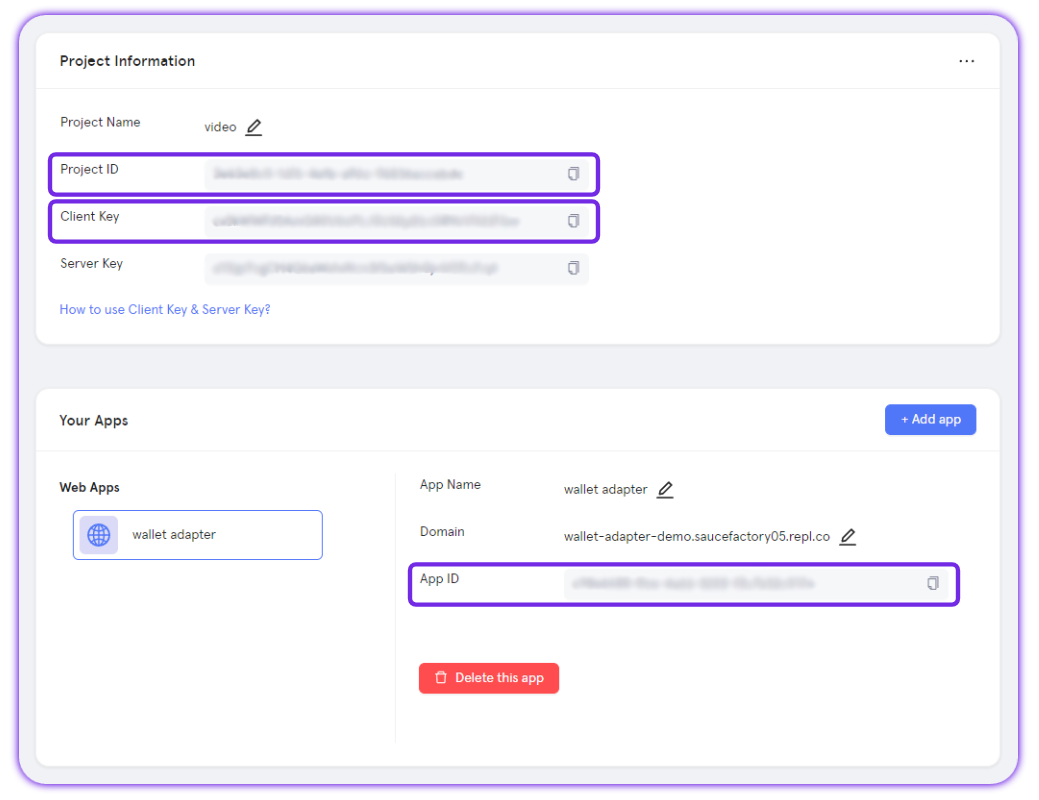
Setting up the Particle dashboard
All implementations of Particle Connect (and Particle Auth) require three universal values: projectId, appId, and clientKey. These values tie a given implementation to the Particle dashboard, enabling configuration, analytics, tracking, etc. To retrieve these values (and use them in the next step), follow the below process:
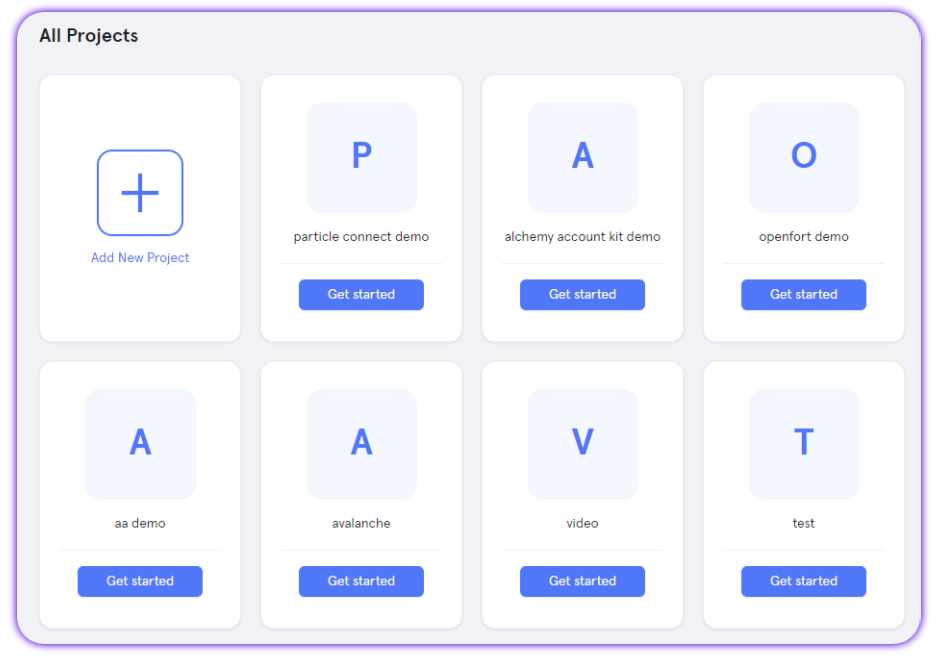
- Sign up/log in to the Particle dashboard.
- Create a new project or enter an existing one.
- Create a new Android application, or skip this step if you already have one.
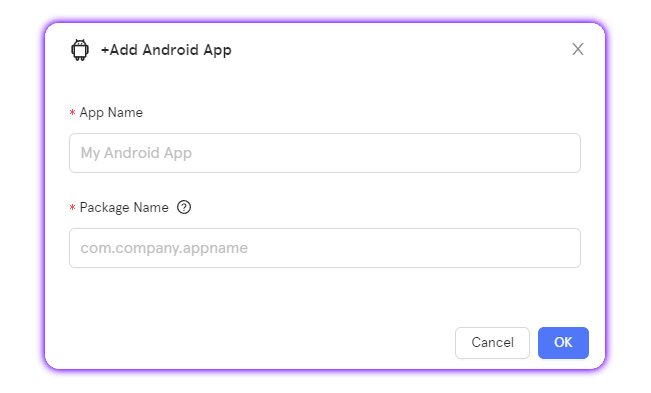
- Retrieve the project ID (
projectId), the client key (clientKey), and the application ID (appId).
Configuration
Now that you've set your dependencies and retrieved your projectId (pn_project_id), clientKey (pn_project_client_key), and appId (pn_app_id), from the Particle dashboard, you'll need to move on to configuring AndroidManifest.xml using the previously retrieved values to authenticate your implementation of Particle Connect.
Open AndroidManifest.xml and either paste the below code or add a configuration that looks as the following:
<application>
    <activity
        android:name="com.particle.network.controller.WebActivity"
        android:exported="true"
        android:launchMode="singleTask"
        android:configChanges="orientation|keyboardHidden|screenSize"
        android:theme="@style/ThemeAuthWeb">
        <intent-filter>
            <data android:scheme="pn${pn_app_id}" />

            <action android:name="android.intent.action.VIEW" />

            <category android:name="android.intent.category.DEFAULT" />
            <category android:name="android.intent.category.BROWSABLE" />
        </intent-filter>
    </activity>

    <activity
        android:name="com.connect.common.controller.RedirectActivity"
        android:exported="true"
        android:launchMode="singleTask"
        android:configChanges="orientation|keyboardHidden|screenSize"
        android:theme="@android:style/Theme.Translucent.NoTitleBar.Fullscreen">
        <intent-filter>
            <action android:name="android.intent.action.VIEW" />

            <category android:name="android.intent.category.DEFAULT" />
            <category android:name="android.intent.category.BROWSABLE" />

            <data android:scheme="connect${PN_APP_ID}" />
        </intent-filter>
    </activity>

    <meta-data
        android:name="particle.network.project_id"
        android:value="${pn_project_id}"/>
    <meta-data
        android:name="particle.network.project_client_key"
        android:value="${pn_project_client_key}"/>
    <meta-data
        android:name="particle.network.app_id"
        android:value="${pn_app_id}"/>
</application>
Initialization
Before jumping into utilization and implementation, you'll need to finish the setup process by initializing Particle Connect within Application#Create() (onCreate()). Until initialization happens, Particle Connect won't work. This acts as the primary means of configuration.
Initialization can be started through the init method on ParticleConnect (from com.particle.connect.ParticleConnect). init takes the following parameters:
this, operational context (you can keep it set tothis).Env, the environment (production, development, etc.) Particle Connect will be initialized within. Imported fromcom.particle.base.Env.ChainInfo, the primary chain to be used within your application.ChainInfocan be set as aChainInfoobject imported fromnetwork.particle.chains.ChainInfo.Companion.{chain}.dAppMetadata, metadata outlining the description of your application. This should be set as an instance ofDAppMetadata(imported fromcom.particle.base.model.DAppMetadata) with the following parameters set:walletConnectProjectId, your WalletConnect project ID retrieved from the WalletConnect dashboard.name, the name of your project.icon, a link containing the logo (icon) of your project; this should be 512x512, ideally.url, the URL of your project's website.description, a short description to be used in representing your project.
- Additionally, within the body of the
init, you'll need to define a list (listOf) wallets (adapters) that you'd like to be provided as an option within your instance of Particle Connect (these can be imported fromcom.wallet.connect.adapter.{Adapter name}).
val dAppMetadata = DAppMetadata(
            walletConnectProjectId = "f431aaea6e4dea6a669c0496f9c009c1",
            name ="Particle Connect",
            icon= "https://connect.particle.network/icons/512.png",
            url = "https://particle.network",
            description = "Particle Connect is a decentralized wallet connection solution that allows users to connect to DApps with their wallets.",
            redirect = "redirect://",
            verifyUrl = "verifyUrl",
        )
ParticleConnect.init(
    this,
    Env.DEV,
    ChainInfo.Ethereum,
    dAppMetadata
) {
    listOf(
        ParticleConnectAdapter(),
        // AuthCoreAdapter(),
        MetaMaskConnectAdapter(),
        RainbowConnectAdapter(),
        TrustConnectAdapter(),
        ImTokenConnectAdapter(),
        BitKeepConnectAdapter(),
        WalletConnectAdapter(),
        PhantomConnectAdapter(),
        EVMConnectAdapter(),
        SolanaConnectAdapter(),
    )
}.
Examples of utilization
Switch Chain
To switch the primary chain being used after initial configuration, you'll need to retroactively call ParticleConnect.setChain, which takes one parameter, chain (should be a ChainInfo object imported from network.particle.chains.ChainInfo.Companion.{chain}). Upon calling this method, the chain will be switched for the current active session, as is shown below:
ParticleConnect.setChain(chain)
Get all Wallet Adapters
If you'd like to retrieve a complete list of current wallet adapters for either evm or solanayou'll need to call ParticleConnect.getAdapters while passing in the chain type, either evm or solana. E.g.:
var adapters = ParticleConnect.getAdapters(chainType)
Get all Connected Accounts
For a list of all currently connected accounts/addresses (via Particle Connect), you can call ParticleConnect.getAccounts while passing in the type of chain to retrieve active accounts for, either evm or solana. E.g.:
val accounts = ParticleConnect.getAccounts(chainType)
Connect Wallet
Upon creating an instance of a given wallet adapter, you can programmatically initiate a connection by calling the connect method on connectAdapter (or the name of the variable you've defined). This will throw a connection prompt to the user, the specifics of which will be dependent on the adapter in question. If you're using either EVMConnectAdapter or SolanaConnectAdapter in this case, these will generate a fresh wallet. E.g.:
connectAdapter.connect(callback)
Disconnect Wallet
To programmatically force an account to disconnect from your application, you'll need to call connectAdapter.disconnect, with connectAdapter referring to an instance of a given wallet adapter. This takes one parameter (other than the callback), address, in which you can specify the address to disconnect. An example of this has been included below. E.g.:
connectAdapter.disconnect(address, callback)
Is Connected
In the fairly common cases where you need to know whether or not a given account is connected, you can use connectAdapter.connected, passing in a targeted address. E.g.:
val result = connectAdapter.connected(address)
Import & Export Wallet
If you're using an instance of either EVMConnectAdapter or SolanaConnectAdapter, in your definition of connectAdapter, you can import a wallet from either a private key or mnemonic (seed phrase). This can be done through either connectAdapter.importWalletFromPrivateKey or connectAdapter.importWalletFromMnemonic, both of which will return an account structure to be used.
Additionally, you can export one of these wallets with connectAdapter.exportWalletPrivateKey, passing in the address (of the EVMConnectAdapter or SolanaConnectAdapter imported/generated wallet) that you'd like to export.
This does not refer to importing/exporting wallets within Particle Auth; Particle Network's MPC-TSS accounts do not support importing/exporting private keys.
This is specific to custom account connection with Particle Connect.
val account = connectAdapter.importWalletFromPrivateKey(privateKey)

val account = connectAdapter.importWalletFromMnemonic(mnemonic)

// Exportation
val privateKey = connectAdapter.exportWalletPrivateKey(address)
Sign and Send Transaction
To initiate a transaction for signature and ultimately settlement on-chain, you'll need to use connectAdapter.signAndSendTransaction (for both EVM and Solana). This will return a popup to the adapter in question, prompting a signature from the end user. Once they confirm, the transaction will be immediately sent to the network.
connectAdapter.signAndSendTransaction takes the following parameters:
address, the user address to target for transaction initiation.transaction, a stringified transaction object (containing fields like 'to', 'from', 'value', 'data', etc.).callback, return handling.
E.g.:
connectAdapter.signAndSendTransaction(address, transaction, callback)
Sign Transaction
connectAdapter.signTransaction is a Solana-specific method for signing a transaction without pushing it to the network. Specifically, this method requires the following parameters:
address, the user address to target for signature initiation.transaction, a base58 string representing a transaction object.callback, return handling.
E.g.:
connectAdapter.signTransaction(address, transaction, callback)

// Alternatively, the plural form of this method, takes a list of transactions
connectAdapter.signAllTransactions(address, transactions, callback)
Sign Message
To sign a basic UTF-8 message (string), you can use connectAdapter.signMessage to prompt the user for a signature alongside the message in question. connectAdapter.signMessage takes the following parameters:
address, the user address to target for signature initiation.message, the message you'd like the user to sign. For EVM, this should be a hex-encoded string (prefixed by '0x'), while for Solana, you can pass in a standard string.callback, return handling.
E.g.:
connectAdapter.signMessage(address, message, callback)
Sign Typed Data
Alternatively, for EVM chains, you can request that a user signs typed (structured) data rather than purely a raw string. To do this, you can use connectAdapter.signTypedData (equivalent to eth_signTypedData). This takes the following parameters:
address, the user address to target for signature initiation.data, the typed data to be signed; see the Web (JavaScript/TypeScript) page for additional guidance.callback, return handling.
E.g.:
connectAdapter.signTypedData(address, data, callback)
Custom WalletConnect Adapter
There may be cases where the existing selection of adapters doesn't include a wallet you'd like to be featured within Particle Connect. In this situation, creating a custom adapter (using WalletConnect) is quite simple. Doing so will require a structure similar to the example below, in which a custom Coin98 adapter is made.
<manifest xmlns:android="http://schemas.android.com/apk/res/android"
    package="com.connect.demo">
    <queries>
        ...
        <package android:name="coin98.crypto.finance.media" />
    </queries>
    <application>
    </application>
</manifest>
class Coin98ConnectAdapter : BaseWalletConnectAdapter() {

  val coin98 = MobileWCWallet(name = "Coin98", packageName = "coin98.crypto.finance.media", scheme = "coin98")

  override val name: WalletName = coin98.name

  override val icon: IconUrl = "https://registry.walletconnect.com/v2/logo/md/dee547be-936a-4c92-9e3f-7a2350a62e00"

  override val url: WebsiteUrl = "https://coin98.com"

  override val mobileWallet: MobileWCWallet = coin98

  override val readyState: WalletReadyState
      get() {
          if (supportChains.contains(ConnectManager.chainType)) {
              return if (AppUtils.isAppInstalled(
                      ConnectManager.context, coin98.packageName
                  )
              ) WalletReadyState.Installed else WalletReadyState.NotDetected
          }
          return WalletReadyState.Unsupported
      }
}