
Particle Auth for Unity (Mobile)
In addition to the Windows/macOS Unity SDK, Particle Auth also extends to standard Unity for Mobile platforms (through C#). This SDK includes all the standard functions required for initializing and interacting with Particle Auth to craft a Web2-adjacent onboarding flow within your Unity games. Instructions setting up, and a rundown of some common functions and examples are covered below.Getting Started
Prerequisites
Your Unity project needs to meet several requirements to avoid any compatibility issues. These requirements will be, in some capacity, dependent on the platform that you’ve decided to use. They are:- Unity 2022.3.43f1 or higher.
- If you’re using iOS:
- Xcode 15.0 or higher.
- CocoaPods 1.14.3 or higher.
- iOS 14 or higher.
- If you’re using Android:
- minSdkVersion 23 or higher.
- compileSdkVersion, targetSdkVersion 34 or higher.
- JavaVersion 17.
- Jetpack (AndroidX).
- Android Gradle Plugin Version : 8.5.1 or higher.
- Gradle Version : 8.9 or higher.
Setting up the Particle dashboard
Once you’ve ensured that your project meets the above prerequisites, you’ll also need three key values from the Particle dashboard: yourprojectId, clientKey, and appId.
These connect your Unity project with the Particle dashboard, enabling customization, analytics, tracking, etc.
Find a guide on how to set up a project and find the required keys: Dashboard Guide.
Configuration
With these values retrieved, you can move on to initial configuration and dependency management. This will vary in complexity depending on the platform in question. To begin, you’ll need to download and install the Particle Unity package, which includes the necessary files for both Particle Connect and Particle Auth. Head over to theparticle-unity GitHub repository, and download the latest release (.unitypackage), then import it into your project.
iOS configuration
If you’re building a Unity game on iOS, you must follow a specific configuration process to ensure that Particle Connect functions. The first step within this process is to set up a scheme URL within the Unity editor.- Head into the iOS Player Settings menu (
Edit->Project Settings->Player Settings->iOS). - From here, select
Other, then scroll down toConfiguration. - Open the
Supported URL schemessection, and within theElement 0field, paste in yourprojectIdwith a prefix ofpn.- For example, if your
projectId(from the Particle dashboard) is something like63bfa427-cf5f-4742-9ff1-e8f5a1b9828f, then the scheme URL would bepn63bfa427-cf5f-4742-9ff1-e8f5a1b9828f.
- For example, if your
Remove other services, if needed
Within ParticleNetworkIOSBridge.cs, you’ll have a number of services
included in the SDK:
- ParticleNetworkBase - required universally.
- ParticleAuthCore - required for Particle Auth Core.
- ParticleConnect- required for Particle Connect.
ParticleWalletGUI- usage of the Particle Wallet UI, contains all services.
- ParticleAA - usage of the Particle AA, contains all services.
pod init, which will generate a Podfile.
Copy our example Podfile
You can copy our example Podfile, it will always use the latest version.
ParticleConnect and CommonConnect will generally suffice, but additional services can be added if needed.
Additionally, you’ll need to paste the code snippet below for installation handling:
Podfile
pod install and open your .xcworkspace file, such as is shown below:
Terminal
projectId, clientKey, and appId previously retrieved. To do this, head into the root of your Xcode project and create a file, ParticleNetwork-Info.plist. Within this file, paste the following text (then replace the placeholders):
ParticleNetwork-Info.plist
-
Download
UnityManger.swift,Unity-iPhone-Bridging-Header.handAppDelegate.swiftfrom under github /Assets/Plugins/iOS/.Swift , Copy files into the root of your Xcode project. Xcode will ask you if auto create Bridging file, click yes.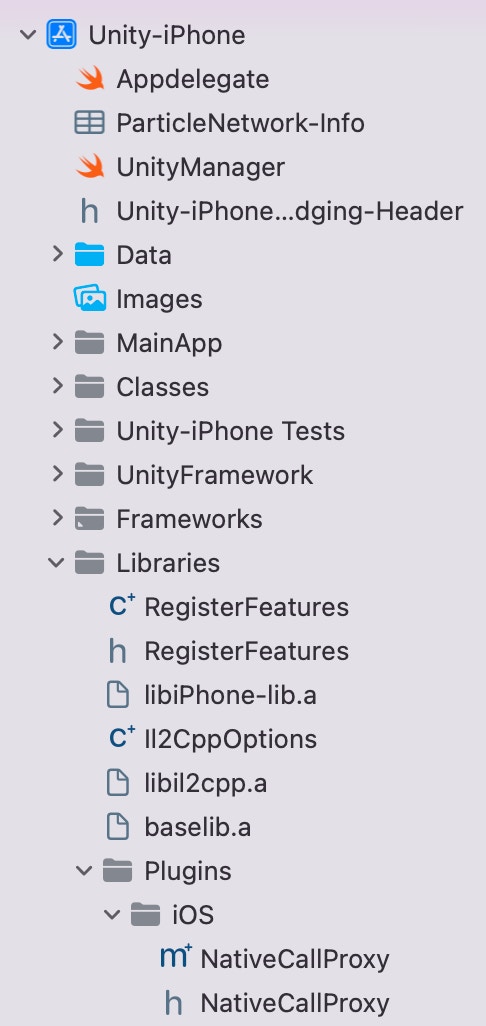
-
Make sure Build Settings, Swift Compiler - General, has Objective-C Bridging Header, its connect is Unity-iPhone-Bridging-Header.h ‘s local path.

- Remove main.mm under MainApp folder.
- Under /Assets/Plugins/iOS are NativeCallProxy files and Swift files , they are required by Unity to interact with iOS code. Remove code under Particle Wallet GUI if you don’t need wallet service.
-
In
UnityManger.swift, it has implemented methods defined inNativeCallProxy.h. -
Select
NativeCallProxy.h, in the file inspector, check public in Target Membership. -
If you want to use
ParticleConnect, you should addLSApplicationQueriesSchemesto info.plist.
Info.plist
Android configuration
Alternatively, if you’re building your Unity game for Android, you’ll just need to configure two files before you’re ready to go. The first of these two files can be found atAssets/Plugins/Android/launcherTemplate.gradle within your project. Here, you’ll need to ensure that you have the necessary dependencies.
Specifically, you’ll need the following dependencies at a minimum:
network.particle:auth-serviceif you’re planning on using Particle Auth Directlynetwork.particle:unity-bridge, required universally- The full list of
network.particlepackages can be found here.
launcherTemplate.gradle
projectId, clientKey, and appId within gradleTemplate.properties, found at Assets/Plugins/Android/gradleTemplate.properties.
gradleTemplate.properties
Initialization
Before you can call core functions within the SDK, you’ll need to initializeParticleNetwork. For the Unity SDK, this is handled by calling init on ParticleNetwork, which is derived from Network.Particle.Scripts.Core and passing in information about the primary chain being used. This is generally pulled from a child of ChainInfo.
Add the prefab to your scene
Additionally, you’ll need to ensureParticleAuthCore.prefab is added to your main scene. This is required as Particle Auth Core will not function otherwise.
Examples of Utilization
Connect
With Particle Auth Core configured and included within your first scene, you can leverage Particle Auth Core to initiate the social login onboarding process and thus unlock the remaining functions within the SDK (post-login). This is achieved and configured viaParticleAuthCore.Instance.Connect. Once this method is called, a corresponding login popup will be displayed requesting user authentication before returning to the application in a signed-in state.
ParticleAuthCore.Instance.Connect takes the following parameters:
ParticleAuthCore.Instance.SendPhoneCode or ParticleAuthCore.Instance.SendEmailCode, connect with method ParticleAuthCore.Instance.ConnectWithCode
Disconnect
Once a user has been logged in, you can programmatically initiate logout throughParticleAuthCore.Instance.Disconnect.
Is Connected
Whether or not a user is logged in may need to be retrieved, specifically in cases where a user stays logged in after refreshing an application due to the continuation of a given session. To check the currently active login status, you can callParticleAuthCore.Instance.IsConnected.
Get User Info
After connected, you can callParticleAuthCoreInteraction.GetUserInfo to retrieve the userInfo.
Get Address
To retrieve the address of the currently active account (either EVM or Solana, depending on the previously selected chain),ParticleAuthCoreInteraction.EvmGetAddress or ParticleAuthCoreInteraction.SolanaGetAddress can be called.
Sign Message
Simple message signing can be achieved by callingParticleAuthCore.Instance.EvmPersonalSign or ParticleAuthCore.Instance.SolanaPersonalSign and passing in a standard string (no need for encoding on this method) with the message you’d like to be prompted for signature.
Sign Transaction
Similarly, for signing a transaction, you’ll need to callParticleAuthCore.Instance.SolanaSignTransaction and pass in a serialized (string) standard transaction object to be prompted for signature. This is a Solana-specific method.
Sign All Transactions
ParticleAuthCore.Instance.SolanaSignAllTransactions is another Solana-specific method that functions adjacent to the former but instead signs multiple (a list of) transactions represented as strings.
Sign And Send Transaction
ParticleAuthCore.Instance.EvmSendTransaction and ParticleAuthCore.Instance.SolanaSignAndSendTransactionare the primary methods within the SDK for sending transactions as it immediately sends a given transaction after requesting signature (confirmation). This will also take a serialized (string) representation of a transaction,
Sign Type Data
ParticleAuthCore.Instance.EvmSignTypedData is an EVM-specific method for signing structured (typed) data. For more information on signTypedData, see the Web (JavaScript/TypeScript) page.
Set ChainInfo
If you’d like to set the primary chain after initial configuration, you’ll need to useParticleNetwork.SetChainInfo, which simply takes a chainInfo object parallel to the type of object passed into the original ParticleNetwork.Init call.
Open Account and Security Page
Following the above, if you’d like to force the opening of account/security settings (in-UI), you can do so withParticleAuthCore.Instance.OpenAccountAndSecurity.
Has Master Password, Payment Password, Security Account
Similarly to theisConnected function covered prior, there are various scenarios in which knowing whether or not a user has specific security settings enabled may be useful. In the case of the Particle Auth Flutter SDK, this can happen in one of two ways:
With the built-in ParticleAuthCoreInteraction.HasMasterPassword, ParticleAuthCoreInteraction.HasPaymentPassword, and ParticleAuthCore.Instance.ChangeMasterPassword methods.
Enable Blind Signing
Silently sign messages/transactions, this switch will work if the following conditions are met:- Your account is connected with JWT
- Your account does not set payment password
- SecurityAccountConfig.promptSettingWhenSign is 0, you can call
ParticleNetwork.SetSecurityAccountConfigto update its value.
EvmService utilization examples
In addition to ParticleAuthCore for authentication and interaction with Particle’s Wallet-as-a-Service, the Unity mobile SDK also includes a class, EvmService, for general interaction with EVM chains.
Write Contract
EvmService.WriteContract allows you to execute a write contract call defined by a specific method and set of parameters. This requires a corresponding ABI, contract address, and requester public address.
Read Contract
EvmService.ReadContract allows you to execute a read-only contract call defined by a specific method and set of parameters. This requires a corresponding ABI, contract address, and requester public address.
Create Transaction
EvmService.CreateTransaction facilitates the construction of a transaction object derived from the standard from, to (receiver in this example), amount (value), and data fields. This transaction, once constructed with EvmService.CreateTransaction, can be passed for in-UI proposal with ParticleAuthCore.Instance.EvmSendTransaction.
Estimate Gas
Given a standard transaction structure (detached set of values, as shown below), gas estimations can be ran to simulate and retrieve the volume of gas to be consumed by a specified transaction (wrapper foreth_estimateGas). This is done through EvmService.EstimateGas.
Get Suggested Gas Fees
To retrieve categorized gas price suggestions (3 categories scaling from low to high) based upon current network conditions, you can callEvmService.SuggestedGasFees.
Get Tokens and NFTs
EvmService also extends to Data API methods such as GetTokensAndNFTs, which returns a highly detailed JSON list of ERC20 tokens and ERC721 NFTs belonging to a specified address. This is accessible through EvmService.GetTokensAndNFTs, passing in the public address to retrieve the tokens and NFTs of.
tokenAddresses is an optional parameter, for get the specific tokens.
Get Transactions by Address
Similar to the former method,EvmService.GetTransactionsByAddress enables the retrieval of a detailed JSON response containing a complete list of transactions involving a specified address.
Get Price
To retrieve the price of specified tokens, you can callEvmService.GetPrice.
Basic RPC method
Basic RPC methods can be called manually throughEvmService.Rpc, as shown below.
SolanaService utilization examples
In addition to ParticleAuthCore for authentication and interaction with Particle’s Wallet-as-a-Service, the Unity mobile SDK also includes a class, SolanaService, for general interaction with Solana chains.
Get Tokens and NFTs
SolanaService also extends to Data API methods such as GetTokensAndNFTs, which returns a highly detailed JSON list of SPL tokens and NFTs belonging to a specified address. This is accessible through SolanaService.GetTokensAndNFTs, passing in the public address to retrieve the tokens and NFTs of.
Serialize Transactions
SolanaService.SerializeSOLTransaction facilitates the construction of a SOL transaction object.
These transactions, once constructed , can be passed for in-UI proposal with ParticleAuthCore.Instance.SolanaSendTransaction.
Get Price
To retrieve the price of specified tokens, you can callSolanaService.GetPrice.
Get transactions by Address
To retrieve transactions executed by a given address, you can callSolanaService.getTransactionsByAddress.
Get Token by Token Address
To obtain the balance of a specified token at a specified address, you can callSolanaService.GetTokenByTokenAddresses.
Basic RPC Method
Similar toEvmService, standard RPC methods can be called through SolanaService.Rpc.