> ## Documentation Index
> Fetch the complete documentation index at: https://developers.particle.network/llms.txt
> Use this file to discover all available pages before exploring further.

# Cocos (JavaScript) - Auth

> Interacting with Particle Auth within applications made using Cocos.

## Particle Auth for Cocos

**Particle Auth** supports Cocos through the Particle Auth Cocos SDK, enabling full integration of Particle's Wallet-as-a-Service within Cocos-based game applications.

The usage of Particle Auth with Cocos is nearly identical to [React Native (JavaScript)](/social-logins/auth/mobile-sdks/react), with the main differences being in prerequisites and initial setup.

This document will guide you through the setup process. For usage examples, refer to the [React Native (JavaScript)](/social-logins/auth/mobile-sdks/react) documentation.

## Getting Started

To start the setup process for the Particle Auth Cocos SDK, make sure your project meets the following prerequisites to ensure compatibility:

* **Cocos 3.7.2** or higher.
* For iOS:
  * **Xcode 15.0** or higher.
  * **CocoaPods 1.14.3** or higher.
  * **iOS 14** or higher.
* For Android:
  * Minimum **API Level 23** or higher.
  * Targets **API Level 31** or higher.
  * Java SDK **version 11**.

Next, you’ll need to retrieve three essential values from the [Particle dashboard](https://dashboard.particle.network), which are required across all of Particle’s SDKs: `projectId`, `clientKey`, and `appId`.

<Note>
  Find a full rundown in the [Dashboard Guide](/social-logins/dashboard)
</Note>

### Installation and configuration

To install and start using the Particle Auth Cocos SDK in your project, follow these steps:

#### Step 1: Copy the Core Assets

1. **Locate the Core Assets directory**:
   * Navigate to the [assets/Mobile/Core directory in the `particle-cocos` repository](https://github.com/Particle-Network/particle-cocos/tree/mobile/assets/Mobile/Core).

2. **Copy the Core Assets directory**:
   * Copy the entire `Core` folder to your project’s `assets` directory.

#### Step 2: Copy the Native Engine Files

1. **Locate the Native Engine directory**:
   * Navigate to the [native/engine directory in the `particle-cocos` repository](https://github.com/Particle-Network/particle-cocos/tree/mobile/native/engine).

2. **Copy the Native Engine directory**:
   * Copy the entire `engine` directory to your project’s `native` directory.

#### Android

If you're using Cocos on Android, the configuration is quite simple and purely requires the placement of the previously retrieved values (`projectId`, `clientKey`, and `appId`) within `$exportDir/proj/gradle.properties,` such as within the example below.

```kotlin gradle.properties theme={null}
android.enableJetifier=true

PN_PROJECT_ID = YOUR_PROJECT_ID

PN_PROJECT_CLIENT_KEY = YOUR_CLIENT_KEY

PN_APP_ID = YOUR_APP_ID
```

#### iOS

If you use iOS, the initial configuration will be more complicated. To begin, ensure you have a Podfile.

If you don't have one already, head over to the root of your Xcode project directory and run:

```shell Terminal theme={null}
pod init
```

Head into this newly generated (or existing) **Podfile** and remove all existing contents, then paste the configuration included below.

Alternatively, if you're already using other SDKs through **CocoaPods**, you can include the Particle Auth SDK declaration:

```ruby Ruby theme={null}
ENV['SWIFT_VERSION'] = '5'
platform :ios, '14.0'
source 'https://github.com/CocoaPods/Specs.git'

target 'boost_container' do
  use_frameworks!
end

target 'cocos_engine' do
  use_frameworks!
end

target 'ParticleCocosDemo-mobile' do
  use_frameworks!
  pod 'ParticleAuthService'
  pod 'ParticleNetworkBase'

end

post_install do |installer|
  installer.pods_project.targets.each do |target|
    target.build_configurations.each do |config|
    config.build_settings['BUILD_LIBRARY_FOR_DISTRIBUTION'] = 'YES'
      end
    end
end
```

Additionally, you can run `pod install --repo-update`, then `open {your project}.xcworkspace` to update and see your project within Xcode.

Now that you've configured your [Particle dashboard](https://dashboard.particle.network), installed the SDK, and configured a Podfile, it's time to initialize the SDK with the aforementioned `projectId`, `clientKey`, and `appId` retrieved from the [Particle dashboard](https://dashboard.particle.network).

1. Create a `ParticleNetwork-Info.plist` file from the root of your corresponding Xcode project.

2. Paste the following text into this file:

   ```xml ParticleNetwork-Info.plist theme={null}
   <?xml version="1.0" encoding="UTF-8"?>
   <!DOCTYPE plist PUBLIC "-//Apple//DTD PLIST 1.0//EN" "http://www.apple.com/DTDs/PropertyList-1.0.dtd">
   <plist version="1.0">
   <dict>
   	<key>PROJECT_UUID</key>
   	<string>YOUR_PROJECT_UUID</string>
   	<key>PROJECT_CLIENT_KEY</key>
   	<string>YOUR_PROJECT_CLIENT_KEY</string>
   	<key>PROJECT_APP_UUID</key>
   	<string>YOUR_PROJECT_APP_UUID</string>
   </dict>
   </plist>
   ```

3. Replace the placeholders with the values retrieved from your project and application within the [Particle dashboard](https://dashboard.particle.network).

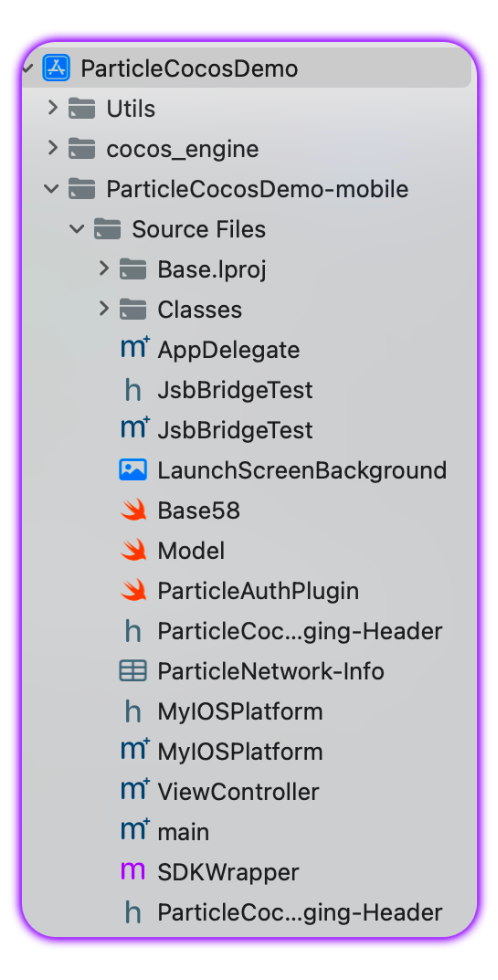
4. Drop the following files into your project and set the target at the main app. Make sure `Base58.swift`, `Model.swift`, and `ParticleAuthPlugin.swift` are marked within `TargetMembership`.

   <Note>If Xcode asks to make a Swift bridging file, select **Yes**.</Note>

<img className="block dark:hidden" src="https://mintcdn.com/particlenetwork-fccf74d2/qB8nYCJPEodZ_ZLJ/social-logins/auth/mobile-sdks/images/cocos.png?fit=max&auto=format&n=qB8nYCJPEodZ_ZLJ&q=85&s=39d67381da84d22d8a0bf4f718a43af4" alt="Particle Network Cocos." width="498" height="980" data-path="social-logins/auth/mobile-sdks/images/cocos.png" />

<img className="hidden dark:block" src="https://mintcdn.com/particlenetwork-fccf74d2/qB8nYCJPEodZ_ZLJ/social-logins/auth/mobile-sdks/images/cocos.png?fit=max&auto=format&n=qB8nYCJPEodZ_ZLJ&q=85&s=39d67381da84d22d8a0bf4f718a43af4" alt="Particle Network Cocos." width="498" height="980" data-path="social-logins/auth/mobile-sdks/images/cocos.png" />

5. Open your `AppDelegate` file and include a custom return within the `(BOOL)application:openURL:options:` method, as shown in the example below:

```Text AppDelegate theme={null}
- (BOOL)application:(UIApplication *)application openURL:(NSURL *)url options:(NSDictionary<UIApplicationOpenURLOptionsKey,id> *)options {
    return [ParticleAuthSchemeManager handleUrl:url];
}
```

6. Within `AppDelegate`, ensure a project-specific import is included at the top of the file. This should be `#import "{project name}-Swift.h"`.

<Warning>
  <p>
    `JsbBridgeTest.m` and `JsbBridgeTest.h` are crucial components, serving as the core bridge between JS and native code.
  </p>

  <p>
    To prevent any issues arising from improper setup, ensure that the code within these files matches the code from the demo or includes the exact code from it.
  </p>
</Warning>

7. Finally, to configure your app scheme URL, select your app from "TARGETS" within the "Info" section, click the plus icon to add the URL types, and paste your scheme in "URL Schemes."

<Note>
  <p>Defining a scheme URL</p>
  <p>Your scheme URL should be "pn" concatenated with your `projectId`.</p>

  <p>
    For example, if your project app id is
    `63bfa427-cf5f-4742-9ff1-e8f5a1b9828f`, your scheme URL is
    `pn63bfa427-cf5f-4742-9ff1-e8f5a1b9828f`.
  </p>
</Note>

***

## Usage

Using the Particle Auth Cocos SDK is identical to the examples provided in the [React Native (JavaScript)](/social-logins/auth/mobile-sdks/react) documentation.

The only difference is the import statement, which should include the internal path `../../Core/particleAuth`, as shown below:

```js JavaScript theme={null}
import * as particleAuth from "../../Core/particleAuth";
```
