> ## Documentation Index
> Fetch the complete documentation index at: https://developers.particle.network/llms.txt
> Use this file to discover all available pages before exploring further.
# Web (JavaScript/TypeScript) - Auth
> Interacting with Particle Auth within web applications using either JavaScript or TypeScript.
# Particle Auth for Web Applications
Among all the SDKs for **Particle Auth**, the Web SDK (`@particle-network/authkit`) is the most widely used. Thus, it offers extensive **support** and **flexibility** in driving onboarding through social logins, facilitating interaction with Particle's Wallet-as-a-Service.
The Particle Auth SDK is the primary mechanism for **configuring** and **using** social logins. **Whether you're starting from scratch** or **already have an onboarding or authentication flow** set up within your application, the Particle Auth Core Web SDK is a simple yet powerful integration.
***
## Getting Started
Check out the [Web Quickstart guide](/social-logins/auth/quickstart/web-quickstart) and get a new project up
and running in just 5 minutes.
To get started with the Particle Auth Web SDK, you can add `@particle-network/authkit` to your project using either of the two following mechanisms:
```shell Install theme={null}
npm install @particle-network/authkit viem@2
yarn add @particle-network/authkit viem@2
```
***
## Configuration
Configuration is primarily handled by wrapping an application with **Particle Auth**'s master configuration component, essential for authenticating your project and [customizing the optional embedded wallet modal](/social-logins/configuration/appearance/wallet).
No matter which **Particle Auth** SDK you're using, you must define your `projectId`, `clientKey`, and `appId` within this configuration object to authenticate your Particle Auth instance properly. Additionally, [you can apply customizations to the wallet modal](/social-logins/configuration/appearance/wallet) for a tailored user experience.
Follow the quickstart tutorial to set up a project and find the required keys: [Create a new
project](/social-logins/auth/quickstart/web-quickstart#configuring-particle-auth).
Below is an example of an `index.tsx` file from a `create-react-app` project. In this example, the `AuthCoreContextProvider` component acts as the configuration wrapper for the entire application.
```typescript @particle-network/authkit theme={null}
import React from 'react'
import ReactDOM from 'react-dom/client'
import { AuthType } from '@particle-network/auth-core';
import { AuthCoreContextProvider, PromptSettingType } from '@particle-network/authkit';
import { mainnet } from '@particle-network/authkit/chains';
import App from './App'
import('buffer').then(({ Buffer }) => {
window.Buffer = Buffer;
});
ReactDOM.createRoot(document.getElementById('root') as HTMLElement).render(
)
```
Learn how to customize the aesthetics of the login and embedded wallet interface in the [Customizing Login
Modal](/social-logins/configuration/appearance/auth) and [Customizing Wallet
Modal](/social-logins/configuration/appearance/wallet) pages.
When using a framework that supports React Server Components, you must include the `"use client"` directive
at the beginning of the file.
***
# Interaction with Web3
Now that you've configured an instance of **Particle Auth**, it's time to leverage Particle to facilitate **social logins** and interactions with **Web3**.
To begin, you'll need to choose between the following interaction mechanisms:
1. **Ethers.js**.
2. **viem**.
3. **Particle native**.
They all achieve the same end goal of facilitating interaction with Web3, although they will result in a slightly different initialization process.
If you've chosen **Particle native**, no initialization of this nature is needed past configuring `AuthCoreContextProvider` or `ParticleNetwork`.
```typescript Ethers.js V5 theme={null}
import { ethers } from "ethers";
import { useEthereum } from '@particle-network/authkit';
const { provider } = useEthereum();
const ethersProvider = new ethers.providers.Web3Provider(provider, "any");
```
```typescript Ethers.js V6 theme={null}
import { ethers, Eip1193Provider } from "ethers";
import { useEthereum } from '@particle-network/authkit';
const { provider } = useEthereum();
const ethersProvider = new ethers.BrowserProvider(
provider as Eip1193Provider,
"any"
);
```
```typescript viem theme={null}
import { createWalletClient, custom } from 'viem'
import { mainnet } from 'viem/chains
import { useEthereum } from '@particle-network/authkit';
const { provider } = useEthereum();
const viemProvider = createWalletClient({
chain: mainnet,
transport: custom(provider)
})
```
You can now use the **provider** object to interact with **Web3**, enabling actions like fetching account balances or sending transactions.
***
## Initiating Social Login
To interact with a user's account (wallet), they must first log in using **Particle Auth** or [Particle Connect](/social-logins/connect/desktop/web), similar to how one would enter a password and unlock MetaMask.
Before interactions can occur, the application must either recognize that the user is already logged in or prompt them to complete the login process.
You can use the `connect` and `connected` functions from the `useConnect()` hook to handle the connection logic:
```typescript theme={null}
import { useConnect } from '@particle-network/authkit';
const { connect, disconnect, connected } = useConnect();
// Handle user login
const handleLogin = async () => {
if (!connected) {
await connect({});
}
};
// Logout user
const handleLogout = async () => {
await disconnect();
};
```
In this example, the `handleLogin` function initiates the login process by displaying the login modal if the `connected` status is `false`, indicating that the user is not currently logged in.
### Customize the Login Experience
You can set specific configurations within the `connect()` function to further tailor the **login** experience beyond [frontend customizations](/social-logins/configuration/appearance/auth).
The following example showcases all available configuration options:
```typescript TypeScript theme={null}
'use client';
import { useConnect } from '@particle-network/authkit';
const { connect, disconnect, connected } = useConnect();
const useInfo = await connect({
// socialType, if set, will skip the auth modal shown above and will instead automatically redirect to a chosen social login
// 'email' | 'phone' | 'google' | 'apple' | 'twitter' | 'facebook' | 'microsoft' | 'linkedin' | 'github' | 'twitch' | 'discord'
socialType: 'google',
phone: '+1xxxxxxxx', // Optional, E.164 format
code: 'xxxxxx', // Optional
authorization: {
uniq: true, // Optional: Defaults to false
message: 'base58 string', // Signature message in hex or base58 for Solana
},
});
```
`web3.eth.getAccounts` will also initiate login automatically if a user isn't already logged in.
***
#### Log in with a Specific Social Platform
You can streamline the login process by bypassing the standard login modal and directing users to log in with a specific social platform.
The following example shows how to automatically prompt users to log in with their Google account, skipping the login modal entirely:
```tsx App.tsx theme={null}
'use client';
import { useConnect } from '@particle-network/authkit';
const { connect, disconnect, connected } = useConnect();
// Handle user login
const handleLogin = async () => {
if (!connected) {
await connect({
socialType: 'google',
});
}
};
```
#### Customizing the Email Login Flow
By default, **Particle Auth** supports email login with an **OTP** (One Time Password) flow through the login modal. However, you can build a custom UI to request and validate OTPs directly, allowing for greater flexibility and control over the authentication experience.
`@particle-network/auth-core` is already included as a dependency in `@particle-network/authkit`, so you don’t need to install it separately.
**Step 1: Request an OTP**
Use the `getConnectCaptcha()` function from `@particle-network/auth-core` to send an **OTP** to the user’s email.
```tsx page.tsx theme={null}
import { getConnectCaptcha } from "@particle-network/auth-core";
// Send an OTP to the email
const sendOtpRequest = async (email) => {
const success = await getConnectCaptcha({ email });
console.log(success ? "OTP sent successfully!" : "Failed to request OTP. Try again.");
};
```
**Step 2: Verify OTP & Log In**
Once the user receives the OTP, use the `connect()` function, including OTP and email within `loginParams`, to verify it and complete the login.
```tsx page.tsx theme={null}
import { ConnectWithEmailParam } from "@particle-network/auth-core";
// Verify the OTP and log in
const verifyOtp = async (email, otp) => {
const loginParams: ConnectWithEmailParam = { email, code: otp };
await connect(loginParams);
console.log("Login successful!");
};
```
Find a complete implementation in the [Particle Auth Custom Email Login repository](https://github.com/Particle-Network/particle-auth-custom-email-otp-demo).
#### Login with JWT
You can use your existing user base or authentication method with Particle Auth through JWT. This way, your users can still log in with their current accounts.
We only support RS256 now, [Example](https://dev-qr6-59ee.us.auth0.com/.well-known/jwks.json).
Before connecting, you must set your custom JWT configuration on the [Dashboard](https://dashboard.particle.network).
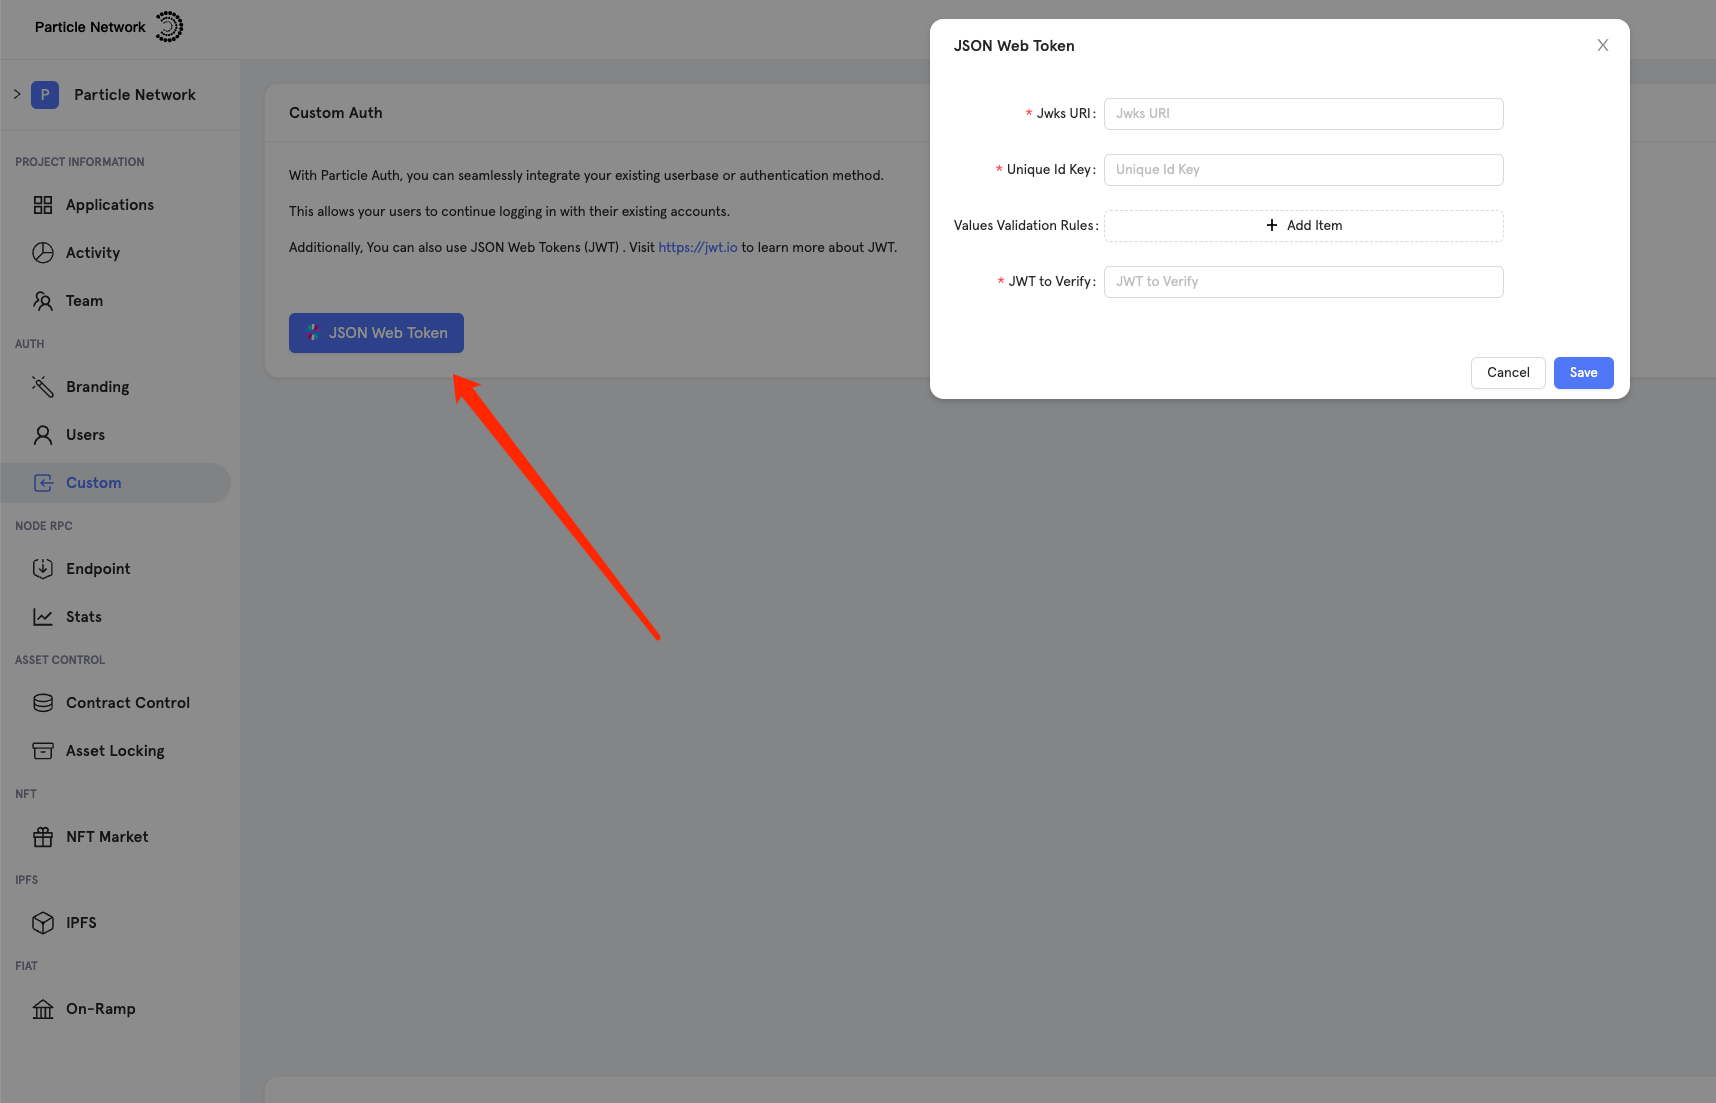 Then, you can refer to the code below to log in using JWT.
```typescript TypeScript theme={null}
'use client';
import { useConnect } from '@particle-network/authkit';
const { connect, disconnect, connected } = useConnect();
// connect with JWT
const userInfo = await connect({
provider: 'jwt',
thirdpartyCode: 'xxxxxxxxxx', // If applicable, JWT value
});
```
Learn more about [Custom Authentication](/social-logins/configuration/auth/jwt).
### Verify User Login Status
The `useConnect()` hook provides several functions to check the user's connection status:
* `connected` — Returns a boolean value indicating whether the user is logged in (`true`) or not (`false`). This is useful for managing login logic.
* `connectionStatus` — Returns a string representing the current stage of the user's flow:
* `loading`
* `connecting`
* `connected`
* `disconnected`
You can use `connectionStatus` to manage login logic or to display relevant status information in the UI.
```tsx page.tsx theme={null}
import { useConnect } from '@particle-network/authkit';
const { connectionStatus } = useConnect();
Then, you can refer to the code below to log in using JWT.
```typescript TypeScript theme={null}
'use client';
import { useConnect } from '@particle-network/authkit';
const { connect, disconnect, connected } = useConnect();
// connect with JWT
const userInfo = await connect({
provider: 'jwt',
thirdpartyCode: 'xxxxxxxxxx', // If applicable, JWT value
});
```
Learn more about [Custom Authentication](/social-logins/configuration/auth/jwt).
### Verify User Login Status
The `useConnect()` hook provides several functions to check the user's connection status:
* `connected` — Returns a boolean value indicating whether the user is logged in (`true`) or not (`false`). This is useful for managing login logic.
* `connectionStatus` — Returns a string representing the current stage of the user's flow:
* `loading`
* `connecting`
* `connected`
* `disconnected`
You can use `connectionStatus` to manage login logic or to display relevant status information in the UI.
```tsx page.tsx theme={null}
import { useConnect } from '@particle-network/authkit';
const { connectionStatus } = useConnect();
{/* Status changes are automatically handled*/}
Status: {connectionStatus}
;
```
### Handling User Information
Once the user is logged in, the `userInfo` object from the `useAuthCore()` hook becomes available.
The result of `connect()` will return the same object.
For example, you can use it to display the user's `name` and `avatar`, or access security details such as `has_set_master_password`.
This allows you to implement logic that prompts the user to set a master password if they haven’t already done so, thereby improving security.
* **uuid**: Unique identifier for the user.
* **created\_at**: Timestamp of when the user account was created.
* **updated\_at**: Timestamp of the last update to the user account.
* **phone**: User's phone number (if available).
* **email**: User's email address (if available).
* **apple\_email**: Email associated with Apple ID (if available).
* **apple\_id**: Apple ID (if available).
* **avatar**: URL to the user’s avatar image.
* **discord\_email**: Email associated with Discord (if available).
* **discord\_id**: Discord ID (if available).
* **facebook\_email**: Email associated with Facebook (if available).
* **facebook\_id**: Facebook ID (if available).
* **github\_email**: Email associated with GitHub (if available).
* **github\_id**: GitHub ID (if available).
* **google\_email**: Email associated with Google.
* **google\_id**: Google ID.
* **jwt\_id**: JSON Web Token ID (if available).
* **linkedin\_email**: Email associated with LinkedIn (if available).
* **linkedin\_id**: LinkedIn ID (if available).
* **microsoft\_email**: Email associated with Microsoft (if available).
* **microsoft\_id**: Microsoft ID (if available).
* **name**: Full name of the user.
* **passkeys\_id**: Passkeys ID (if available).
* **security\_account**: Object containing security-related fields:
* **has\_set\_master\_password**: Boolean indicating if a master password is set.
* **has\_set\_payment\_password**: Boolean indicating if a payment password is set.
* **payment\_password\_updated\_at**: Timestamp of the last update to the payment password.
* **telegram\_id**: Telegram ID (if available).
* **telegram\_phone**: Phone number associated with Telegram (if available).
* **thirdparty\_user\_info**: Object containing third-party authentication info:
* **provider**: Name of the third-party provider (e.g., "Google").
* **user\_info**: Object with detailed user information:
* **email**: Email used with the third-party provider.
* **id**: User ID associated with the third-party provider.
* **name**: Name associated with the third-party provider.
* **picture**: URL to the user’s profile picture from the third-party provider.
* **token**: Token used for authentication.
* **twitch\_email**: Email associated with Twitch (if available).
* **twitch\_id**: Twitch ID (if available).
* **twitter\_email**: Email associated with Twitter (if available).
* **twitter\_id**: Twitter ID (if available).
* **wallets**: Array of wallet objects:
* **uuid**: Unique identifier for the wallet.
* **chain\_name**: Name of the blockchain associated with the wallet (e.g., "evm\_chain", "solana").
The following is an example of how you can render user information taken from `userInfo`:
```tsx App.tsx theme={null}
const { userInfo } = useAuthCore();
// Or
// const userInfo = await connect();
{
userInfo && (
{/*
In this card, we display info from Particle Auth
*/}
Accounts info
Name: {userInfo.name}

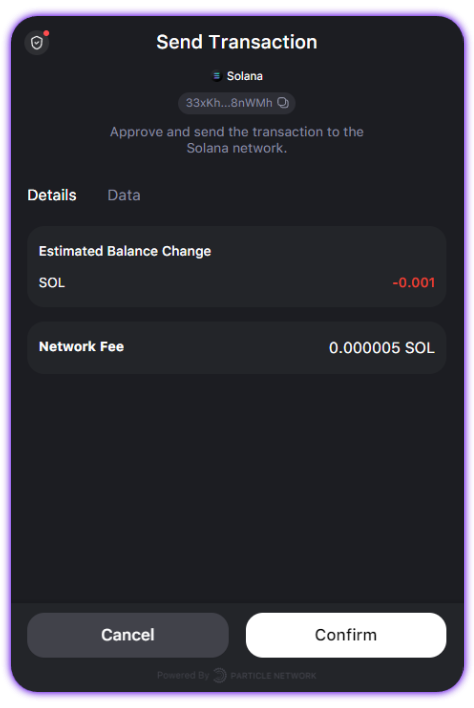
To the end-user, sending transactions, regardless of the chosen method, looks like this (depending on
customization outlined in the [Particle dashboard](https://dashboard.particle.network/)).
 ***
## Data Signing
In cases where you'd like to sign either a raw string (personal) or typed data (`eth_signTypedData`), the process is quite straightforward.
You can accomplish this using standard libraries like **Ethers** or leveraging **Particle’s** native functionality. The examples below illustrate both approaches.
For instance, when sending transactions, the signatures are automatically formatted and presented to the user in a popup request. This ensures a user-friendly experience by displaying the relevant data in UTF-8 format.
### Personal Signatures
```typescript Particle (EVM) theme={null}
const msg = 'GM, Particle!';
// After configuring AuthCoreContextProvider and logging in
const { signMessage } = useEthereum();
const result = await signMessage(msg);
```
```typescript Particle (Solana) theme={null}
import { useSolana } from '@particle-network/authkit';
// After configuring AuthCoreContextProvider and logging in
const { signMessage } = useSolana();
const result = await signMessage('base58 string');
```
```typescript Ethers.js theme={null}
const msg = 'GM, Particle!';
const signer = ethersProvider.getSigner();
const accounts = await signer.getAddress();
signer
.signMessage(msg)
.then((result) => {
console.log('personal_sign', result);
})
.catch((error) => {
console.error('personal_sign', error);
});
```
### Sign Typed Data
```typescript Particle (EVM) theme={null}
// Placeholder data
const msg = { ... };
// After configuring AuthCoreContextProvider and logging in
const { signTypedData } = useEthereum();
const result = await signTypedData({ data: msg, version: 'V4' });
```
***
## Enabling Blind Signatures
To enable blind signatures (signing without a confirmation popup) in Particle Auth, certain conditions must be met when configuring the `AuthCoreContextProvider` component and setting up the authentication flow.
1. **Master Password Requirement**
* Users must either:
* Have entered the master password, or
* Not have set a master password in the first place.
2. **No Payment Password**
* Users should not have set a payment password (as this interrupts the signing process).
3. **Disable Payment Password Prompt Setting**
* Set the `promptPaymentPasswordSettingWhenSign` parameter to `false` within [`AuthCoreContextProvider`](/social-logins/auth/desktop-sdks/web#configuration).
```typescript theme={null}
// Configuration for disabling payment password prompt
promptSettingConfig = {
promptPaymentPasswordSettingWhenSign: false,
};
```
When these conditions are satisfied, blind signing is enabled.
***
## Particle Native Hooks
Below is a collection of examples describing the different hooks available with **Particle Auth**.
These hooks facilitate social login and native application-level interaction (such as message signing, sending transactions, etc.) directly through **Particle Auth**.
### useConnect
`useConnect` acts as the primary hook for facilitating login (connection) with **Particle Auth**.
```typescript TypeScript theme={null}
import { useConnect } from '@particle-network/authkit';
const { connect, disconnect, connected, connectionStatus, requestConnectCaptcha, setSocialConnectCallback } =
useConnect();
const userInfo = await connect();
const isLoggedIn = connected;
await disconnect();
```
### useEthereum
`useEthereum` provides direct interaction with a given **EVM** chain as an alternative to a traditional library such as **ethers**.
```typescript TypeScript theme={null}
const {
provider, // EIP1193 provider
address, // EVM public address
chainId, // Current chain
chainInfo,
switchChain,
signMessage,
signTypedData,
sendTransaction,
enable,
} = useEthereum();
const txHash = await sendTransaction({
to: '0xe8fc0baE43aA264064199dd494d0f6630E692e73',
value: '1000000',
});
const signature = await signMessage(message);
const signature = await signTypedData(typedData);
await switchChain('0x1'); // Also takes a standard number
```
### useSolana
`useSolana` is one of the primary ways to use **Solana** with **Particle Auth** if you aren't using an external connection modal such as `wallet-adapter`.
```typescript TypeScript theme={null}
import { useSolana } from '@particle-network/authkit';
const {
address, // Solana public address
chainId, // Current chain (Mainnet, Testnet, Devnet)
chainInfo,
switchChain,
signMessage,
signTransaction,
signAllTransactions,
signAndSendTransaction,
enable,
} = useSolana();
const txHash = await signAndSendTransaction(txData);
const signature = await signMessage(message);
```
### useAuthCore
`useAuthCore` provides additional functionality, such as retrieving `userInfo` after login, forcing different account menus to open, accessing the on-ramp page, and more.
```typescript TypeScript theme={null}
import { useAuthCore } from '@particle-network/authkit';
const {
userInfo, // Standard user info, null is returned if not connected
needRestoreWallet, // Whether or not a master password is needed from the current user
openAccountAndSecurity, // Opens account and security modal
openSetMasterPassword, // Opens set master password modal
openChangeMasterPassword, // Opens change master password modal
openRestoreByMasterPassword, // Opens input master password modal
openSetPaymentPassword, // Opens set payment password modal
openChangePaymentPassword, // Opens change payment password modal
openSetSecurityAccount, // Opens set security account modal
openLinkLoginAccount, // Opens link login account modal
openWallet, // Opens wallet in iframe
getWalletIFrame, // Manages the embedded wallet modal, used for opening the wallet modal in a custom iframe
openBuy, // Opens the onramp aggregation page
} = useAuthCore();
```
### useCustomize
`useCustomize` provides several methods for customizing the wallet modal, such as changing the theme type (light or dark), creating a custom style, changing the language, and more.
```typescript TypeScript theme={null}
import { useCustomize } from '@particle-network/authkit';
const {
setThemeType, // Sets theme type, 'light' or 'dark'
setCustomStyle, // Sets custom modal styles
setWalletOptions, // Sets wallet modal options
setLanguage, // Sets language being used
setFiatCoin, // Sets fiat coin being used
setERC4337, // Sets whether the modal has ERC-4337 enabled
} = useCustomize();
```
***
## Data Signing
In cases where you'd like to sign either a raw string (personal) or typed data (`eth_signTypedData`), the process is quite straightforward.
You can accomplish this using standard libraries like **Ethers** or leveraging **Particle’s** native functionality. The examples below illustrate both approaches.
For instance, when sending transactions, the signatures are automatically formatted and presented to the user in a popup request. This ensures a user-friendly experience by displaying the relevant data in UTF-8 format.
### Personal Signatures
```typescript Particle (EVM) theme={null}
const msg = 'GM, Particle!';
// After configuring AuthCoreContextProvider and logging in
const { signMessage } = useEthereum();
const result = await signMessage(msg);
```
```typescript Particle (Solana) theme={null}
import { useSolana } from '@particle-network/authkit';
// After configuring AuthCoreContextProvider and logging in
const { signMessage } = useSolana();
const result = await signMessage('base58 string');
```
```typescript Ethers.js theme={null}
const msg = 'GM, Particle!';
const signer = ethersProvider.getSigner();
const accounts = await signer.getAddress();
signer
.signMessage(msg)
.then((result) => {
console.log('personal_sign', result);
})
.catch((error) => {
console.error('personal_sign', error);
});
```
### Sign Typed Data
```typescript Particle (EVM) theme={null}
// Placeholder data
const msg = { ... };
// After configuring AuthCoreContextProvider and logging in
const { signTypedData } = useEthereum();
const result = await signTypedData({ data: msg, version: 'V4' });
```
***
## Enabling Blind Signatures
To enable blind signatures (signing without a confirmation popup) in Particle Auth, certain conditions must be met when configuring the `AuthCoreContextProvider` component and setting up the authentication flow.
1. **Master Password Requirement**
* Users must either:
* Have entered the master password, or
* Not have set a master password in the first place.
2. **No Payment Password**
* Users should not have set a payment password (as this interrupts the signing process).
3. **Disable Payment Password Prompt Setting**
* Set the `promptPaymentPasswordSettingWhenSign` parameter to `false` within [`AuthCoreContextProvider`](/social-logins/auth/desktop-sdks/web#configuration).
```typescript theme={null}
// Configuration for disabling payment password prompt
promptSettingConfig = {
promptPaymentPasswordSettingWhenSign: false,
};
```
When these conditions are satisfied, blind signing is enabled.
***
## Particle Native Hooks
Below is a collection of examples describing the different hooks available with **Particle Auth**.
These hooks facilitate social login and native application-level interaction (such as message signing, sending transactions, etc.) directly through **Particle Auth**.
### useConnect
`useConnect` acts as the primary hook for facilitating login (connection) with **Particle Auth**.
```typescript TypeScript theme={null}
import { useConnect } from '@particle-network/authkit';
const { connect, disconnect, connected, connectionStatus, requestConnectCaptcha, setSocialConnectCallback } =
useConnect();
const userInfo = await connect();
const isLoggedIn = connected;
await disconnect();
```
### useEthereum
`useEthereum` provides direct interaction with a given **EVM** chain as an alternative to a traditional library such as **ethers**.
```typescript TypeScript theme={null}
const {
provider, // EIP1193 provider
address, // EVM public address
chainId, // Current chain
chainInfo,
switchChain,
signMessage,
signTypedData,
sendTransaction,
enable,
} = useEthereum();
const txHash = await sendTransaction({
to: '0xe8fc0baE43aA264064199dd494d0f6630E692e73',
value: '1000000',
});
const signature = await signMessage(message);
const signature = await signTypedData(typedData);
await switchChain('0x1'); // Also takes a standard number
```
### useSolana
`useSolana` is one of the primary ways to use **Solana** with **Particle Auth** if you aren't using an external connection modal such as `wallet-adapter`.
```typescript TypeScript theme={null}
import { useSolana } from '@particle-network/authkit';
const {
address, // Solana public address
chainId, // Current chain (Mainnet, Testnet, Devnet)
chainInfo,
switchChain,
signMessage,
signTransaction,
signAllTransactions,
signAndSendTransaction,
enable,
} = useSolana();
const txHash = await signAndSendTransaction(txData);
const signature = await signMessage(message);
```
### useAuthCore
`useAuthCore` provides additional functionality, such as retrieving `userInfo` after login, forcing different account menus to open, accessing the on-ramp page, and more.
```typescript TypeScript theme={null}
import { useAuthCore } from '@particle-network/authkit';
const {
userInfo, // Standard user info, null is returned if not connected
needRestoreWallet, // Whether or not a master password is needed from the current user
openAccountAndSecurity, // Opens account and security modal
openSetMasterPassword, // Opens set master password modal
openChangeMasterPassword, // Opens change master password modal
openRestoreByMasterPassword, // Opens input master password modal
openSetPaymentPassword, // Opens set payment password modal
openChangePaymentPassword, // Opens change payment password modal
openSetSecurityAccount, // Opens set security account modal
openLinkLoginAccount, // Opens link login account modal
openWallet, // Opens wallet in iframe
getWalletIFrame, // Manages the embedded wallet modal, used for opening the wallet modal in a custom iframe
openBuy, // Opens the onramp aggregation page
} = useAuthCore();
```
### useCustomize
`useCustomize` provides several methods for customizing the wallet modal, such as changing the theme type (light or dark), creating a custom style, changing the language, and more.
```typescript TypeScript theme={null}
import { useCustomize } from '@particle-network/authkit';
const {
setThemeType, // Sets theme type, 'light' or 'dark'
setCustomStyle, // Sets custom modal styles
setWalletOptions, // Sets wallet modal options
setLanguage, // Sets language being used
setFiatCoin, // Sets fiat coin being used
setERC4337, // Sets whether the modal has ERC-4337 enabled
} = useCustomize();
```